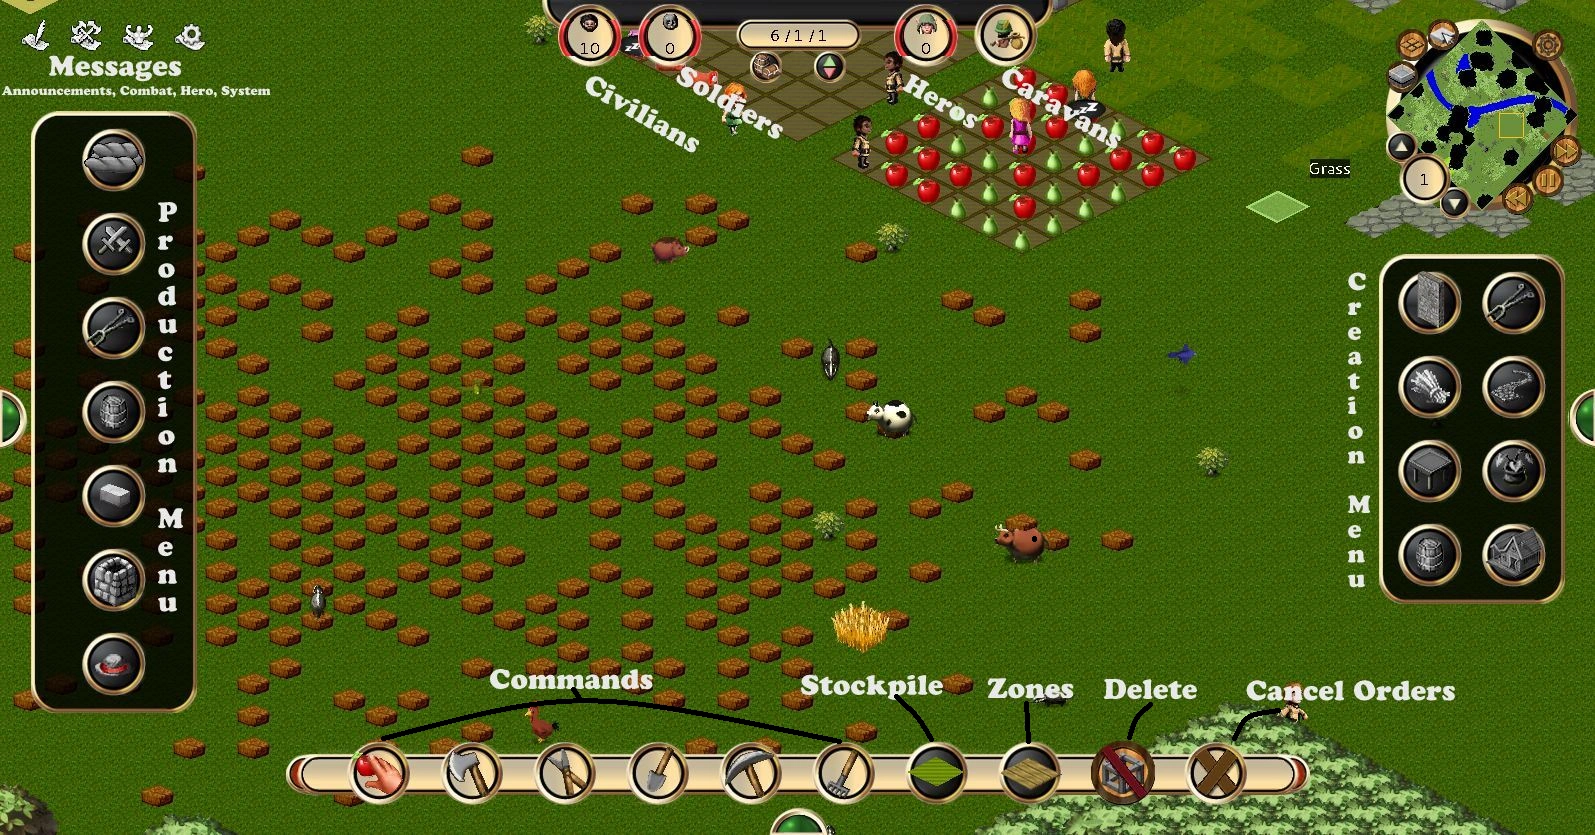
The Menu or UI (user interface) is made up from several tool bars and buttons.
Basic coverage of the user interface
The Menu is made up of several sections:
- The Production Menu is opened by clicking the semi-circle on the left side on the screen, if you hover over it, the menu will be opened temporarily. The production menu allows you to place orders for immediate construction or to allow you to build up a stock of a range of different items. Please see the production menu article for more information.
- The Creation Menu is on the right, and is opened in the same way as the Production Menu. It allows you to, as the name implies, create and place an assortment of walls, utilities, planting, roads, furniture, decorations, containers and buildings immediately.
- The Command bar along the bottom enables you to order widespread commands such as cut and chop.
- Also along the bottom are the buttons for placing stockpiles and zones. To place them, click the correct button, then click somewhere in the game world. Drag out the square or rectangle to the size you want, then click again. If the area you are trying to place is red, you did not choose a suitable area.
- The Delete button allows for the deletion of scaffolding, but no other blocks.
- The last button is the cancel order. It can cancel any commands and orders to craft and place items from the creation menu.
- The Minimap is located in the top right of the screen and it has details on the current level. It has 9 buttons surrounding it and they are used for...
- Flattening blocks (Globally (Z) or around the cursor (T))
- Turning the isometric grid on/off (G)
- The settings menu (ESC)
- Speed controls (Speed up (+), speed down(-) and pause (SPACEBAR))
- The level controls which tell you what level you are on and allow you to change level (MOUSE SCROLL).
- The Messages in the top left will give you information on everything that's happened/happening. They will flash red when something new comes up, hovering over it will show a basic list of the last three things and clicking it will open up the full list. Clicking on an individual message will center the camera on the associated event or the affiliated living entity. If the message is about the death of one of your civilians, the camera will be centered on the enemy rather than the location of where he/she died.
- There is a icon missing that goes between your messages and citizen population.
- This is for events and shows you what events are happening in your map at that time.
- The remaining buttons on the top-center of the screen focuses on organisation.
- Three of the four larger buttons cycle through the current population. It also shows the number of people in the groups. From the left, these buttons correspond to Civilians (E/R), Soldiers and Heroes (H). Clicking on any of these buttons will bring out a panel with configuration options.
- The large button on the far right opens the Caravan menu (F4) and allows trading using the market system.
- The very top display is the current date in the format dd/mm/yy.
- Under this date display are two small buttons which corresponds to the Stock panel (F2) and the Priorities panel (F3).